How to set up local development for Kirby and Tailwind, Version 2
I wrote the first version of this post in September 2020 — as a reminder to my future self — and as a starting point for others, who have struggled (just like me) with this complicated process.
Creating that original post (as a beginner) took me weeks of trial and error to get everything to work, and weeks more to write.
To my surprise, this — my hardest post to write — soon became the most popular post on my website.
But, since then, Tailwind has had a major upgrade in version 3.0 — with a new ‘Just-in-Time engine’ replacing its original ‘purge’ process — making it much simpler to run, but significantly different to install and set up.
As my original post still gets daily traffic, I’ve been feeling guilty for months, that it’s become so out-of-date.
So, at last, I’ve installed the latest versions of Tailwind and Kirby, on a new 14 inch MacBook Pro, and on my original iMac. Enabling me to test and re-write this step-by-step beginner’s guide, version 2.
Step 1 Set up Apple’s Terminal app + install Xcode command line tools
ZSH is the default shell that Apple recommends in its Terminal app, since macOS Catalina. Apple’s Support site has more details, including these instructions for resetting the Terminal to use ZSH:
-
Open the Terminal app, and after the prompt, paste or key in:
chsh -s /bin/zshThen press return to run that command. -
Then check if Apple’s Xcode command line tools need to be installed, by entering the command:
xcode-select --installand follow the instructions to install them, if prompted. Wait until everything has downloaded (around 20 minutes with a 20 Mbps connection).

Step 2 Practice using the command-line
If your command-line knowledge is as sketchy as mine was, I recommend Launch School’s excellent free guide, Introduction to the Command Line. I learned tons from this, and I wish I’d found it before I started. Its short section on $PATH and Executables is especially useful.
Also recommended, but for different reasons, is Tracy Osborn’s Really Friendly Command Line Intro. Tracy’s hand-drawn zine is only a starting point for beginners — but if you’re in a hurry, it might be just enough to get you through my step-by-step instructions below.
In fact, you might even manage with just these two little lists:
Step 3 Install Homebrew
Homebrew is a package manager for macOS, needed below to install PHP, Composer, and Node/NPM packages.
-
To install Homebrew, paste and enter the command at the top of Homebrew's front page. Currently, this is:
/bin/bash -c "$(curl -fsSL https://raw.githubusercontent.com/Homebrew/install/HEAD/install.sh)" -
On Intel Macs, that should be all you need to do – the latest version of Homebrew should install itself into the
/usr/local/bindirectory, which should already be configured in your macOS default PATH environment variable. -
But, on Silicon-powered Macs, Homebrew puts its files in a new location:
/opt/homebrew/bin/brewand PATH variables need to be added in a different hidden file:.zprofileinstead of.zshrc -
Luckily, the latest version of Homebrew provides the correct commands needed, helpfully displayed in the Terminal a few lines above the prompt line. These commands are personalised for your user name and your Mac, so all you need to do is copy and paste each command.
-
For my Silicon-powered MacBook, these two commands read:
echo 'eval "$(/opt/homebrew/bin/brew shellenv)"' >> /Users/my-user-name/.zprofile
and:
eval "$(/opt/homebrew/bin/brew shellenv)"
(Different from theexport PATH…commands I’m now familiar with. Nevertheless, they worked first time.) -
To check that Homebrew is successfully installed, enter the command
brew -vto output Homebrew’s version info. -
To upgrade or delete Homebrew’s packages, checkout the glossary and instructions on their FAQ page. Importantly, this means first updating Homebrew, using the command
brew update, before upgrading a package, eg:brew upgrade php
Step 4 Install PHP
To install Kirby's recommended version of PHP (currently 8.0), using Homebrew:
-
Enter the command
brew install php@8.0 -
Then enter the command to start PHP running in the background (now, and automatically at every future macOS startup):
brew services start php@8.0 -
To confirm that this newly-installed PHP version is now active, enter
php -v, to confirm that it’s version 8.0, not the previous installed version, or the macOS default.
Step 5 Install Composer
Composer is a dependency manager for PHP (like a package manager, but per-project instead of system-wide). It’s needed below to install Kirby and Laravel Valet.
To install Composer I used Homebrew again (simpler to install and upgrade, than the instructions on Composer’s website):
-
Enter the command:
brew install composer -
To make sure packages installed by Composer get found by Terminal commands, create another PATH variable by entering:
echo 'export PATH="~/.composer/vendor/bin:$PATH"'>>~/.zprofilefor Silicon Macs, or:
echo 'export PATH="~/.composer/vendor/bin:$PATH"'>>~/.zshrcfor Intel Macs. -
Enter the command
source ~/.zprofileorsource ~/.zshrcto activate the PATH. -
To confirm all is well, enter:
composer -vto output Composer’s version info.
Step 6 Install Kirby CMS
First we set up a folder structure for local development files, and then use Composer to install Kirby CMS.
Inside our home folder we’ll create a local development folder I’ve called ‘Sites’, and inside that we’ll use Composer to create (and populate) a folder for the new Kirby site, that I’ve called ‘mysitename’.
This site folder name will later be used by Laravel Valet to serve its local URL, at http://mysitename.test so it would be simplest for you to make ‘mysitename’ exactly the same as your new site’s domain name.
-
Enter the command:
cd ~to make sure you’re in your user home directory, then:mkdir Sitesfollowed by:cd Sites -
Then install either Kirby’s Starterkit or Plainkit, based on Kirby’s Starting a new project recipe — using the command:
composer create-project getkirby/starterkit mysitenameor:
composer create-project getkirby/plainkit mysitename -
In addition to Kirby's folder structure, this will also create a couple of extra files needed to control future updates using Composer:
composer.jsonandcomposer.lock -
As described in more detail in Updating Kirby, the command to update the version specified in
composer.jsonis:composer update getkirby/cmsor:
composer update getkirby/cms -wto include all dependencies.
Step 7 Install Laravel Valet
Laravel Valet is a virtual web server that runs ‘locally’ on your computer, in the background on macOS.
After installing Valet using Composer, and setting up the valet park command, every project folder inside the ‘Sites’ folder becomes accessible to any browser on your computer, at http://mysitename-1.test and http://mysitename-2.test etc.
You only need to set up Valet once — after that everything runs automatically each time macOS restarts — and, for me, so far it’s been completely transparent, and trouble-free.
-
To install Laravel and Valet, enter the command:
composer global require laravel/valet -
Then enter:
valet install -
To check Valet is installed, and accessible, enter:
valet -vto get its version info. -
And then confirm that its server is running, with the command:
ping valet.test, which should return127.0.0.1 -
Enter:
control-cto stop the pinging! -
To set up Valet to serve all the project folders inside the Sites folder, first make sure you are working inside the Sites folder with the command:
cd ~/Sites -
Then enter the command:
valet park -
That’s it! Because all of Kirby’s content is stored as text files in macOS’s folder hierarchy, there’s no need to set up a database. So, you should now be able to access your newly installed Kirby site, live in any browser on your Mac, at:
http://mysitename.test -
You can drag and drop any other Kirby project folder into your Sites folder, anytime in the future, and it will be automatically served by Valet, with no other commands needed.
-
To get a list of all the projects served from the Sites folder, enter
valet parked, then your macOS account password when prompted. -
Checkout Laravel's excellent documentation for more info on updating, maintaining, customising, and troubleshooting Valet.
If you don’t want to install Tailwind, but you do want to run Browsersync, you should first install Node and NPM in Step 8 and then skip to Step 16
Step 8 Install Node and NPM
Node.js is an important JavaScript runtime environment, and NPM is its package manager. Both are needed below to set up TailwindCSS processing, and then to install Browsersync. I installed them using Homebrew (I’d read here that this avoids some permissions complications of using Node’s official installer).
-
To install Node and NPM together using Homebrew, simply enter:
brew install node -
You can confirm that these are correctly installed, and available to Terminal commands, by entering:
node -vor:npm -vto output their version numbers.
Step 9 Read Tailwind’s latest documentation
Tailwind's website, and its Getting Started documentation, are both terrific, and well worth studying in detail — with a coffee — before proceeding.
There are three alternative installation methods listed in Tailwind’s instructions:
- Tailwind CLI (the new and simpler first-party method)
- PostCSS (Tailwind’s original method)
- Other framework guides
My instructions below are based on the PostCSS method, which provides the option of adding other useful PostCSS plugins.
Update, 10 June 2022: Released only a couple of weeks after writing this post, the latest Tailwind version 3.1 now includes PostCSS-import, PostCSS-nested, and CSSnano — all built-in to the simpler Tailwind CLI installation method. However, I’ve used PostCSS-nesting extensively in my coding (with a different syntax from PostCSS-nested), so I’ll stick with this more complicated PostCSS method, for now.
Step 10 Install and set up Tailwind CSS + PostCSS + Autoprefixer
PostCSS and Autoprefixer are Node packages that Tailwind uses to process its files, and then output them to CSS.
-
Enter the command
cd ~/Sites/mysitenameto change directory to the correct project folder. Don’t forget to stay in this folder for the steps below! -
Create an empty
package.jsonfile in themysitenamefolder by entering the command:npm init -y -
Then install the packages needed, by entering the command:
npm install -D tailwindcss postcss postcss-cli autoprefixer
This creates a new folder callednode_modulesinside themysitenamefolder, to store these in.
(For some reasonpostcss-cliisn’t included in Tailwind’s PostCSS install instructions, but my install refused to work without it!) -
Create an empty
tailwind.config.jsfile in themysitenamefolder, by entering the command:npx tailwind init -
Create a new
postcss.config.jsfile in the same folder, by entering the command:touch ~/Sites/mysitename/postcss.config.js -
Open
postcss.config.jsin a text editor, and list the plugins we want to use, by pasting or keying in the following:module.exports = { plugins: [ require('tailwindcss'), require('autoprefixer'), ] }
Step 11 (Optional) Add PostCSS-nesting + PostCSS-import + CSSnano plugins
The PostCSS-nesting plugin enables W3C Working Group’s CSS-nesting syntax in custom CSS and Tailwind components stylesheets.
Most projects (especially if they use Tailwind’s Typography plugin) won’t need this. However I used CSS-nesting extensively for my site's Markdown and KirbyText content, using (super-powerful) coding patterns like this:
.markdown {
  & h1,
  & h2,
  & h3 {
    @apply mt-6 sm:mt-8;
    & + * {
      @apply mt-2 sm:mt-3;
    }
  }
}
The PostCSS-import plugin allows several CSS files to be imported and combined into a single CSS file. This helped me to manage my site’s complicated stylesheets, as detailed in Step 13 below.
Finally, as my compiled stylesheet grew ever-larger, CSSnano was a no-brainer: it achieved a saving of over 20%, just by removing white space and comments.
-
Make sure you’re still in the
mysitenamefolder, by entering the command:cd ~/Sites/mysitename -
Enter the command:
npm install -D postcss-import postcss-nesting cssnano(but, omitting the plugins you don’t want). -
Open
postcss.config.jsin a text editor, and insert a new line for each plugin you’ve just installed, in order, exactly as below:module.exports = { plugins: [ require('postcss-import'), require('tailwindcss/nesting')(require('postcss-nesting')), require('tailwindcss'), require('autoprefixer'), require('cssnano'), ] }
Or, you can use this alternative syntax…
…which was introduced (confusingly for me, at least) in Tailwind 3.0’s installation instructions:
module.exports = {
     plugins: {
       'postcss-import': {},
       'tailwindcss/nesting': 'postcss-nesting',
        tailwindcss: {},
        autoprefixer: {},
       'cssnano': {},
     }
}
Step 12 Set up a ‘main’ CSS file to import Tailwind files, and add your custom CSS and components
Here we’ll set up the main CSS file needed to generate a production-ready stylesheet from Tailwind’s Node files, customised with your own CSS and Tailwind @apply components:
-
Create a new folder, which I’ve called
stylesheetsinside your Kirby site’s Site folder, by entering the command:mkdir ~/Sites/mysitename/site/stylesheets -
Create a new file, which I’ve called
main.cssinside this new folder, by entering the command:touch ~/Sites/mysitename/site/stylesheets/main.css -
Open
main.cssin a text editor, and set up Tailwind’s processing directives, by pasting or keying in the following:@tailwind base; @tailwind components; /* ---- custom css and @apply components go here ---- */ @tailwind utilities;
Step 13 (Optional) Set up files to structure your custom CSS
If you’ve installed the PostCSS-import plugin, in Step 11, to structure and manage your custom CSS:
-
Create new files, which I’ve called
custom-1.cssandcustom-2.cssetc, inside the ‘stylesheets’ folder, by entering the commands:
touch ~/Sites/mysitename/site/stylesheets/custom-1.cssand:
touch ~/Sites/mysitename/site/stylesheets/custom-2.cssetc. -
Cut all your custom CSS code out of
main.cssand paste it intocustom-1.cssandcustom-2.cssetc, splitting it into your own logical structure. -
Open
main.cssin a text editor, and replace the code you’ve just removed, with the following:@import "tailwindcss/base”; @import "tailwindcss/components”; @import "custom-1.css”; @import "custom-2.css”; /* ---- etc ---- */ @import "tailwindcss/utilities”;
Step 14 Set up ‘Just-in-Time’ PostCSS processing
The latest Tailwind version 3 incorporates a new ‘Just-in-Time engine’ to generate a single CSS file from all your PHP templates, Tailwind utilities, and custom CSS files.
This JIT-engine works in the background, and so by incorporating CSSnano, it can generate a fully production-ready stylesheet, continuously during development — greatly simplifying the production process.
First we’ll create a new style.css file. Then we’ll insert a ‘watch’ script into the package.json file, to process the main.css file and output its compiled CSS into the new style.css file. And finally, in the tailwind.config file, we’ll specify which PHP and CSS files will trigger the watch script:
-
If you’re using Kirby’s PlainKit, you’ll need to create a new folder, called
assetsinside themysitenamefolder, by entering the command:mkdir ~/Sites/mysitename/assets -
Create a new file, which I’ve called
style.cssinside theassetsfolder, by entering the command:touch ~/Sites/mysitename/assets/style.css -
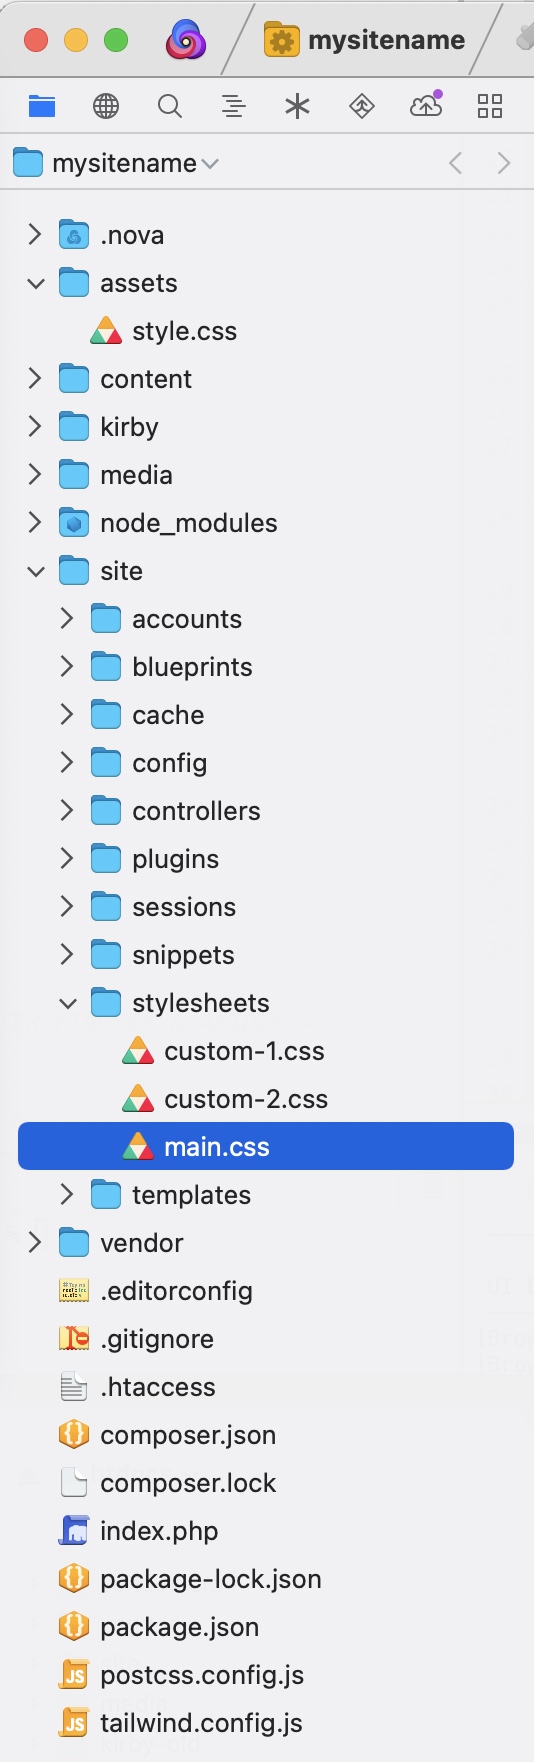
Depending on your own customising, the folder structure for your new Kirby site should now include all the files and folders shown in the screenshot alongside.
-
Next, open the
package.jsonfile in a text editor and insert the following ‘watch’ script, on a new line immediately after the opening{bracket:
"scripts": { "watch": "postcss site/stylesheets/main.css -o assets/style.css --watch", }, -
Finally, open
tailwind.config.jsin a text editor, and paste or key in the script below (based on the file locations shown in the screenshot above):module.exports = { content: [ './site/templates/*.php', './site/snippets/*.php', './site/stylesheets/*.css', ], theme: {}, variants: {}, plugins: [], }
Step 15 Link Tailwind to your Kirby templates, and start the ‘watch’ script to process its files
Process all the Tailwind directives, custom CSS, and @apply components from your main.css file, and save them into your style.css file:
-
Using Kirby's CSS helper syntax, link the new
style.cssfile to your Kirby templates, by adding this new line to their<head>elements:<?= css('assets/style.css') ?> -
Make sure you’re still in the
mysitenamefolder, by entering the commandcd ~/Sites/mysitename— it’s easy to forget this command, when you’re busy coding! -
Enter the command
npm run watchto run the watch script, automatically, every time you save a change to your PHP and CSS files. -
To stop the
watchcommand, enter:control-c
Generating this production stylesheet normally only takes a few seconds, and it runs continuously in the background.
Then, because Kirby is file-based, it’s quick and easy to synchronise the local site with its ‘live’ internet server — using an FTP client such as Forklift, or Panic’s Transmit, or Panic Nova’s super-slick Publish workflow.
Step 16 Set up and run Browsersync
Browsersync also runs in the background, watching for changes to your files during local development, and automatically triggers a refresh in any open browser window. It’s easy to install using NPM — and for me, it’s always been completely reliable and trouble-free.
-
Open a new Terminal window, and make sure you’re in your site’s folder by entering the command:
cd ~/sites/mysitename -
To install Browsersync locally, enter the command:
npm install browser-sync --save-dev -
Then, to run Browsersync in the background during development, you enter something similar to this example command, but adjusted to your site’s specific file structure:
browser-sync start --proxy "mysitename.test" --files "assets/style.css, site/snippets/*.php, site/templates/*.php, content/**/*.txt"This example watches for changes to
style.cssin theassetsfolder; to PHP files in thesnippetsandtemplatesfolders; and to text files which are any number of folders deep in thecontentfolder.As soon as it’s run, this command will automatically open your site in a new browser tab, at
localhost:3000and this will refresh every time you save one of your watched files during development. -
To stop Browsersync, enter:
control-c -
To preview edits made in Kirby’s content panel, open
http://mysitename.test/panel/page-namein one browser window, andlocalhost:3000/page-namein another.But avoid using
localhost:3000/panel/page-namefor panel editing, as this (annoyingly) scrolls back to the top of the panel, every time you save. -
To simplify running the complicated script in command 3 above, I’ve been using Panic Nova’s Custom Task workflow, which saves the script in a Nova project, so it can be started and stopped with a single click.
You’ve reached the end!
Despite my best efforts, this has still ended up a long and complicated post — even longer than the first version. At the same time, it’s enabled me to ‘stress-test’ and extend my blog’s fancy Markdown typography, and hopefully this has made it easier to navigate.
So, thank you for reading thus far. I hope it’s been helpful, but not too overwhelming!